Maps in SQL
Data Definition
Maps for Pac-Man are pleasantly simple compared to modern games: the playing field consists of a two-dimensional regular grid. Cells can either be stepped on by actors (= Pac-Man or any of the ghosts) or not. A cell can hold a regular pellet, a power pellet, a fruit, or nothing. That gives us the following schema for the map:
1
2
3
4
5
6
7
8
9
10
11
12
13
14
15
16
17
18
19
20
CREATE TABLE environment.item_types(
    id   SERIAL PRIMARY KEY,
    name TEXT
);

INSERT INTO environment.item_types(name) (VALUES
    ('pellet'),
    ('power pellet'),
    ('cherry')
);

CREATE TABLE environment.cells(
    id       SERIAL PRIMARY KEY,
    x        INT,
    y        INT,
    passable BOOLEAN,
    content  INT DEFAULT 1, -- pellet
    UNIQUE(x, y),
    FOREIGN KEY(content) REFERENCES environment.item_types(id)
);
We could stop at this point, as this gives us all the desired functionality to navigate our actors and determine collisions with the environment. But we will go for a little extra fun.
Smooth Walls
When looking at the walls in the original Pac-Man, you will notice the walls are not solid, but only outlined.
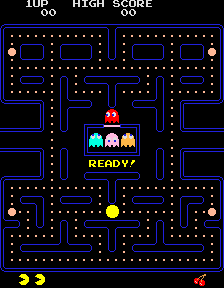 Image source: Wikipedia.
With our current data structure, we can only visualise walls very plainly as adjacent blocks that are either outlined, which will show the border in-between each pair of adjacent blocks, or fill them completely to look more like a solid wall, but not quite as nice as in the original game.
Biting Off Pieces
To fix this, we can decompose all blocked cells into connected components, which are induced subgraphs in which all vertices are connected through a series of edge traversals. Or in other words: a part of a graph that forms a contiguous shape. Dissecting our map graph into such components in the case of Pac-Man is rather easy1: cells are either walkable or not (i.e., the cell contains a wall). Colour a cell black if it is walkable and blue if it is not. Cells belong to the same component as their neighbour if they share the same colour. Programmatically, this can be achieved using a simple flood fill algorithm:
- Select an arbitrary uncoloured pixel p.
- Choose a random (but to this point unused) colour c.
- Colour p using c.
- Propagate c to all direct neighbours of c. For each neighbour of c, go to 3.
- If there are uncoloured pixels left, go to 1.
But since we are working with database, we will try to think less in a one-at-a-time fashion, but use relations instead. For this, we will run one flood fill per pixel – all at the same time. Instead of using colours, pixels will propagate a unique ID to their neighbours. If you look back at the schema for environment.cells (which, really, holds the pixels of the map) you will notice that they already have a serial primary key which works pretty well for this purpose:
So each cell will try and propagate their ID to their direct neighbours as illustrated above. For the sake of the reader’s mental well-being, I will visualise the process for only one of the shapes. Differently coloured fills happen “at the same time”. That does not necessarily mean “in parallel” (although the DBMS could do that), but rather “in the same pass”.
Notice how smaller numbers do not prevail against their neighbours, resulting in very short floods. So we do not end up with exponential runtime, as we would if we flooded every ID through the entire component. The presented shape is conveniently laid out like a corridor, so the flooding only goes in one direction. But if it were to be an open space, the flooding would go on into every direction. Grouping and aggregating the results of the different passes leaves us with the following final result:
Now we only need to deterministically select the ID that should be preferred over all other IDs in that list. I chose MAX to do that for me.
1
2
3
4
5
6
7
8
9
10
11
12
13
14
15
16
17
18
19
20
21
22
23
24
25
26
27
28
29
30
31
32
33
34
35
36
37
38
39
40
41
42
43
44
CREATE VIEW environment.compound_walls(cell_id, x, y, component_id) AS (
    WITH RECURSIVE
    comps↺(cell_id, component_id) AS (
        SELECT
            id AS cell_id,
            id AS component_id
        FROM
            environment.cells
        WHERE
            NOT passable
        UNION
        (
            WITH comps AS (TABLE comps↺) -- hack to work around restriction to not use aggregates in recursive term
            TABLE comps
            UNION ALL
            SELECT
                cn.this_id,
                MAX(n_comps.component_id)
            FROM
                comps
                JOIN environment.cell_neighbourhoods AS cn
                  ON comps.cell_id = cn.this_id
                JOIN environment.cells AS c
                  ON cn.neighbour_id = c.id
                JOIN comps AS n_comps
                  ON cn.neighbour_id = n_comps.cell_id
            WHERE
                NOT c.passable
            GROUP BY
                cn.this_id
        )
    )
    SELECT
        comps.cell_id,
        THE(c.x),
        THE(c.y),
        MAX(comps.component_id)
    FROM
        comps↺ AS comps
        JOIN environment.cells AS c
          ON comps.cell_id = c.id
    GROUP BY
        comps.cell_id
);
The above query gives us one ID (component_id) per cell. All cells with the same component_id belong to the same connected component. THE2 is an aggregation operator that expects a list of identical values and selects an arbitrary element from that list, i.e. THE([42,42,42,42]) → 42.
Are We There Yet?!
Not quite! So far, we have only assigned each cell, or more specifically: each cell that is part of a wall, to a connected component. This is already a nice thing to have, as we could now easily determine a bounding rectangle for each piece of wall. Using those is a common way to speed up collision detection, as you can start a coarse-grained search for collisions between object’s bounding rectangles, before going for the pixel-exact collision checks. They go well with a glass of wine and a side of Quadtree – a spatial index structure that many DBMSs come bundled with or can be enhanced with using an extension3. But that is not what we were going for. We wanted to outline each wall piece, and for that we need another nice algorithm. Meet the marching squares algorithm! Marching squares basically observes the edge of a shape through a pinhole (a 2×2 rectangle) and depending on what it sees, it moves the pinhole a bit up, down, to the left, or to the right, effectively marching around the shape in question.
Notice how we have multiple pinholes: one per connected component. They can all be moved at the same time and do not have to finish all at once. See how the yellow rectangle patiently waits for its red sibling to stop? That has nothing to do with their imminent collision; the yellow rectangle has simply finished its lap around its assigned shape already.
Assuming that each pixel a pinhole sees is either part of the shape (■) or not (□), that leaves us with 4² = 16 different images we can see through the pinhole, and for each we can define how the pinhole should be shifted.
□□     ■■     □□     ■■
□□ →   □□ →   ■■ ←   ■□ →

□■     ■□     ■□     ■□
□□ →   □□ ↑   ■■ ↑   □■ ↑

□■     ■□     □■     □■
□■ ↓   ■□ ↑   ■■ ←   ■□ ←

□□     □□     ■■     ■■
□■ ↓   ■□ ←   □■ ↓   ■■ ✕
We start out by putting the 16 possible images we can see through the pinhole into a table (or rather: CTE). Removing line breaks gives us a unique hash for every combination. The direction can be expressed in terms of an (x,y)-shift. E.g. ('□□□□', 1, 0) is “when encountering □□□□, add 1 to the x-position of the pinhole and leave y-position be”. I omitted the 16th ■■■■-state, as it is basically an error-state, implying that the pinhole is set directly onto a solid object, rather than its edge.
1
2
3
4
5
6
7
8
9
CREATE VIEW environment.wall_shapes(wall, coordinates) AS (
WITH RECURSIVE
moves(hash, x_off, y_off) AS (
    VALUES
    ('□□□□',  1,  0), ('■■□□',  1,  0), ('□□■■', -1,  0), ('■■■□', 1,  0),
    ('□■□□',  1,  0), ('■□□□',  0, -1), ('■□■■',  0, -1), ('■□□■', 0, -1),
    ('□■□■',  0,  1), ('■□■□',  0, -1), ('□■■■',  -1, 0), ('□■■□', -1, 0),
    ('□□□■',  0,  1), ('□□■□', -1,  0), ('■■□■',  0,  1)
),
We start out with a grid where we know the appropriate component ID for each cell (see above). We also add a bit of fluff to each side of the map. One row/ column of empty cells to each side, to be exact. This is required to properly walk around shapes that extend all the way to the edge of the map.
1
2
3
4
5
6
7
8
9
10
11
12
13
14
15
16
17
18
19
20
21
22
grid(x, y, passable, component_id) AS (
    WITH fluffed(x, y) AS (
        SELECT x,y FROM environment.cells
        UNION -- using UNION we do not get duplicate cells, but just the extra cells outside of the original map's borders
        SELECT
            c.x + xs.x,
            c.y + ys.y
        FROM
            environment.cells AS c,
            generate_series(-1,1) AS xs(x),
            generate_series(-1,1) AS ys(y)
    )
    SELECT
        f.x,
        f.y,
        cw.component_id IS NULL,
        cw.component_id
    FROM
        fluffed AS f
        LEFT JOIN environment.compound_walls AS cw
          ON (cw.x, cw.y) = (f.x, f.y)
),
For each component we select one coordinate to start from. In general, you can choose an arbitrary position to start. But here I chose the bottom-right-most cell of each component. Marching squares has a bit of an issue with bodies with holes in them. Depending on what your offsets define and where you start, you will either get the shape describing the inside or the outside of the body. The only body with a hole in it in the case of Pac-Man is the outer wall which confines the map. I would like the inner shape of that, hence the starting point.
1
2
3
4
5
6
7
8
9
10
11
12
start_coordinates(x, y, component_id) AS (
    SELECT DISTINCT ON (component_id)
        x,
        y,
        component_id
    FROM
        grid
    WHERE
        component_id IS NOT NULL
    ORDER BY
        component_id, y DESC, x DESC
),
Now we would like to make each starting coordinate into a square. To do so, we only need to add the three adjacent cells to each starting point. We will re-use these offsets quite a bit later on, so we put them in their own CTE.
1
2
3
4
5
6
7
8
square_offsets(x, y) AS (
    SELECT
        xs.x,
        ys.y
    FROM
        generate_series(0,1) AS xs(x),
        generate_series(0,1) AS ys(y)
),
And off we go! Marching squares works as described:
- at the position of all pinholes (we have one per component) span a 2×2 rectangle (
squares) - hash what you are seeing through the pinholes (
hashes) - join the constructed hashes on the possible hashes from
moves - select the next position for each pinhole by applying the offsets from
moveswe just found.
Each pinhole stops moving if it would move onto its starting position, thus producing no new row for the recursive CTE. If all pinholes have stopped moving, no new rows are produced and the recursion stops.
1
2
3
4
5
6
7
8
9
10
11
12
13
14
15
16
17
18
19
20
21
22
23
24
25
26
27
28
29
30
31
32
33
34
35
36
37
38
39
40
41
42
43
44
45
46
47
48
49
50
51
52
53
54
55
56
57
58
59
60
61
62
63
64
65
66
67
68
69
marching_squares↺(iteration, x, y, component_id, start) AS (
    SELECT
        1,
        x,
        y,
        component_id,
        (x, y)
    FROM
        start_coordinates
    UNION ALL
    (
    WITH
    squares(iteration, origin_x, origin_y, x, y, passable, component_id, start) AS (
        WITH coordinates(iteration, component_id, origin_x, origin_y, neighbour_x, neighbour_y, start) AS (
            SELECT
                ms.iteration    AS iteration,
                ms.component_id AS component_id,
                ms.x            AS origin_x,
                ms.y            AS origin_y,
                ms.x - so.x     AS neighbour_x, -- using minus here is important to match the resulting squares with the hashes! (origin needs to be lower right coordinate of the square)
                ms.y - so.y     AS neighbour_y,
                ms.start        AS start
            FROM
                marching_squares↺ AS ms,
                square_offsets    AS so
        )
        SELECT
            c.iteration       AS iteration,
            c.origin_x        AS origin_x,
            c.origin_y        AS origin_y,
            grid.x            AS x,
            grid.y            AS y,
            grid.passable     AS passable,
            c.component_id    AS component_id,
            c.start           AS start
        FROM
            coordinates AS c
            JOIN grid
              ON (c.neighbour_x, c.neighbour_y) = (grid.x, grid.y)
    ),
    hashes(iteration, origin_x, origin_y, component_id, hash, start) AS (
        SELECT
            iteration,
            origin_x,
            origin_y,
            THE(component_id),
            string_agg(CASE WHEN passable THEN '□' ELSE '■' END ,'' ORDER BY y,x), -- yes, y,x is correct
            start
        FROM
            squares
        GROUP BY
            origin_x, origin_y, start, iteration
    )
    SELECT
        hashes.iteration + 1        AS iteration,
        grid.x                      AS x,
        grid.y                      AS y,
        hashes.component_id         AS component_id,
        hashes.start                AS start
    FROM
        hashes
        JOIN moves
          ON hashes.hash = moves.hash
        JOIN grid
          ON (hashes.origin_x + moves.x_off, hashes.origin_y + moves.y_off) = (grid.x, grid.y)
    WHERE
        (grid.x, grid.y) <> hashes.start
    )
),
Now just a bit of cleanup and we are done. As we stopped each pinhole before going to its starting position, we need to close the shape “manually” by adding each pinhole’s starting position as its final position as well:
1
2
3
4
5
6
7
8
9
10
11
12
13
14
15
16
17
18
19
closed(component_id, iteration, x, y) AS (
    SELECT
        component_id,
        iteration,
        x,
        y
    FROM
        marching_squares↺ AS ms
    UNION ALL
    SELECT
        component_id,
        (SELECT MAX(iteration) + 1 FROM marching_squares↺), -- this guarantees that the closing line will always come last in the following ordering
        x,
        y
    FROM
        marching_squares↺ AS ms
    WHERE
        iteration = 1
),
That’s it. The result is a series of positions the pinholes assumed when marching around each shape which an sorting order defined by iteration. Dumping these into a regular old drawing library as a list of lineTo(x,y)-instructions would result in the outlines for our walls.
But I have a little bit of icing left for this cake: marching squares actually produces too many instructions per wall. To be exact, it yields every encircled point in the following image:
But since we will be drawing straight lines between points, we actually only need the position of each corner from which we change direction:
I’ll admit, this probably falls into the realm of premature optimisation, as it saves us only a few intermediate points for our use case at hand. But scaled up to much larger maps and with the goal in mind to do as much heavy lifting on the DBMS and slim down the clients as much as possible, let’s do it! It’s super easy anyway: for each point we look at the the point preceding and succeeding it. If they all share either their x- or their x-position, they are all part of a horizontal or vertical line and the point we are looking at is superfluous and can be marked as such.
1
2
3
4
5
6
7
8
9
10
11
12
13
14
15
reduced(component_id, iteration, x, y, superfluous) AS (
    SELECT
        component_id,
        iteration,
        x,
        y,
        COALESCE(
            LEAD(x) OVER(PARTITION BY component_id ORDER BY iteration) = x AND LAG(x) OVER(PARTITION BY component_id ORDER BY iteration) = x
            OR
            LEAD(y) OVER(PARTITION BY component_id ORDER BY iteration) = y AND LAG(y) OVER(PARTITION BY component_id ORDER BY iteration) = y
        , FALSE) -- first and last piece will be NULL
          AS superfluous
    FROM
        closed
)
For the final step (pinky promise!) we select the relevant information and convert them into a format that is easily understandable for our rendering engine:
1
2
3
4
5
6
7
8
9
10
SELECT
    component_id,
    array_agg(array[x,y] ORDER BY iteration)
FROM
    reduced
WHERE
    NOT superfluous
GROUP BY
    component_id
);
And there we have it. Beautiful, outlined walls as we know and love them:
The result for one map I actually use for Pac-Man looks like this:
 wall |                                                    coordinates
------+-------------------------------------------------------------------------------------------------------------------
   16 | { {0,6},{0,10},{11,10},{11,0},{0,0},{0,6} }
   28 | { {2,7},{2,8},{3,8},{3,7},{2,7} }
   34 | { {3,3},{3,4},{4,4},{4,2},{2,2},{2,3},{3,3} }
   46 | { {4,5},{3,5},{3,6},{5,6},{5,5},{4,5} }
   54 | { {5,3},{5,4},{6,4},{6,1},{10,1},{10,4},{9,4},{9,6},{10,6},{10,9},{1,9},{1,6},{2,6},{2,4},{1,4},{1,1},{5,1},{5,3} }
   68 | { {6,7},{4,7},{4,8},{7,8},{7,7},{6,7} }
   74 | { {7,3},{7,4},{8,4},{8,3},{9,3},{9,2},{7,2},{7,3} }
   76 | { {7,5},{6,5},{6,6},{8,6},{8,5},{7,5} }
   83 | { {8,2},{7,2},{7,4},{8,4},{8,3},{9,3},{9,2},{8,2} }
   88 | { {8,7},{8,8},{9,8},{9,7},{8,7} }
  110 | { {10,9},{1,9},{1,6},{2,6},{2,4},{1,4},{1,1},{5,1},{5,4},{6,4},{6,1},{10,1},{10,4},{9,4},{9,6},{10,6},{10,9} }
(11 rows)
This is what a client will receive when connecting to the Pac-Man-DB and asking for the map shape. No brains for the client required, just connecting dots. The full code with a bit of context can be found in the project’s GitHub repository.
-
Connected components can be quite ambiguous when you are dealing with different terrain types and different entity types that can travel on different terrains. Fish and ducks will consider different terrain types passable and therefore form different connected components. ↩
-
Simon P. Jones and Philip Wadler. “Comprehensive Comprehensions”. ↩
-
Going from 2D to 3D you would have bounding boxes and Octrees instead. ↩