Smarting Up My Onkyo Receiver
For a while now I have been obsessed with smart home. It’s just so convenient! Especially when using an open source solution like Home Assistant where you can integrate most smart devices, regardless whether they use WiFi, Zigbee, Bluetooth, or whatnot.
But some devices were just not built with smartness in mind. Such is my trusty receiver, an Onkyo TX-SR333.
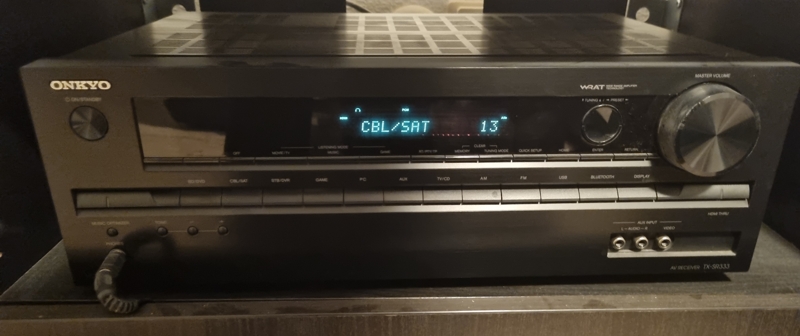
To be fair, it’s an awesome device and I am mainly using it for its multiple HDMI ports. After all, we have quite some devices we use regularly:
- Fire TV Stick for watching Netflix et al.
- Play Station 4, mainly for watching Blu-rays
- Steam Link for in-house streaming from my gaming PC
- Nintendo Switch for even moar gaming.
So several times now, we have sat down on the couch with our favourite snacks to watch a movie, started the projector (much better than any TV!), the smart blinders started rolling down automatically, the light dimmed down, and… then we realised the receiver was still set to the wrong input.
Now you’re probably saying “duuh. There’s this little thing called ‘remote control’ which comes with every modern receiver. Just use that!”. And while you are certainly right I’d like to introduce you to the remote that comes with the TX-SR333:
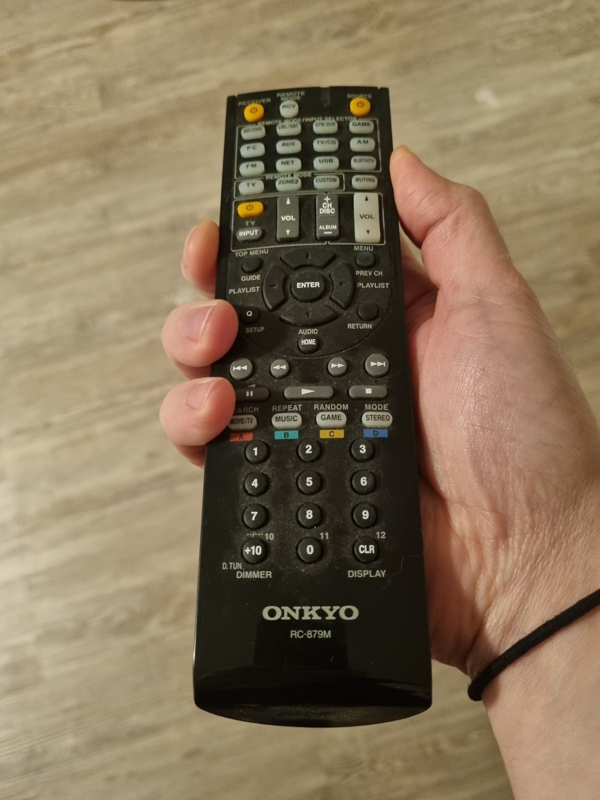
It’s just soo big and bulky and I am barely even using half of the buttons on there. I’d just prefer to have a single remote lying around. And that’s the remote for the Fire TV Stick, which is very compact, has an on/off-switch for the projector, buttons for volume, and voice control to start whatever app I need. Plus the inputs are all named weirdly and I keep forgetting if the input called “STB/DVR” is wired to the Switch or the PS4.
Smarting Up
So I decided to smart up the receiver. There are probably very clever ways out there to hack the device itself, access the wires and to write and even read states. But I am just not that good with electronics (sadly). I therefore tried to look for alternative ways to control our receiver. I figured the easiest way for me to do that is to run a web server on some microcontroller to receive commands through HTTP requests and forward them to the receiver. I went for some ESP32 dev kit which I had lying around here for my first prototype and ended up using a Wemos D1 Mini for the final product.
First route I tried was tapping into the Onkyo RI port. The RI port is basically a 3.5 audio jack which allows external devices, such as docking stations for iPads, to control the receiver. The available commands depend largely on the Onkyo device in question and there is also an awesome project on GitHub which implements the Onkyo RI protocol on Arduino and similar devices. To my dismay I found out that the TX-SR333 barely supports any commands over RI that would be useful for my use case.
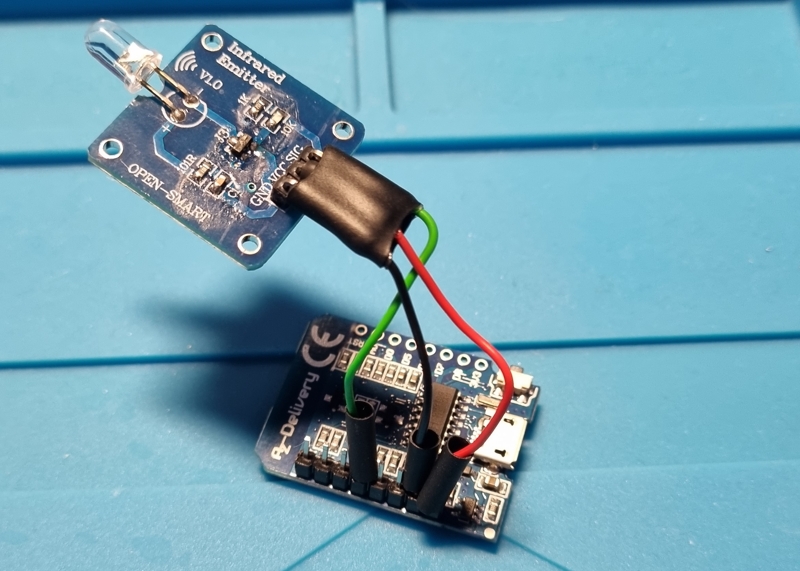
I therefore discarded the idea and instead went for the infrared commands that are being sent by the regular remote. For that I bought a infrared bundle on Amazon which contains both a sender and a receiver. At the time of writing this post, the bundle is no longer available on Amazon and frankly, the quality is pretty bad, as some reviewers also stated. The range of the sender is abysmal, but for my project that was fine, as I can place the sender directly on top of the IR-receiver of my Onkyo device. Luckily, you can download an Arduino library to both send and receive infrared signals. The supplied example file (File → Examples → IRemote8266 → IRRrecvDemo) worked great for finding the relevant codes for my device! I just connected an IR sensor to the board, pointed the Onkyo remote at it, pressed all relevant buttons in order, and wrote down the codes that popped up on the serial monitor:
0x4B3631CE: BD/DVD0x4BB6708F: CBL/SAT0x4BB6F00F: STB/DVR0x4BB6B04F: GAME0x4BB639C6: PC0x4BB6F906: AUX0x4BB6906F: TV/CD0x4B780A70: BLUETOOTH0x4BB640BF: VOL UP0x4BB6C03F: VOL DOWN0x4B36D32C: POWER0x4BB6A05F: MUTING
Next, I removed the IR sensor, put up an IR sender instead and wrote a little script to run a web server with a single HTTP route to receive commands which then control the IR sender.
Casing
I have taught myself a bit of FreeCAD, so the casing is by no means perfect, but it works fine. The case for the MC (brown) and the sender (purple) can be printed as a single part. Wedge the MC into the brown casing, mount the IR sender onto the pins of the purple casing, close with the lid.
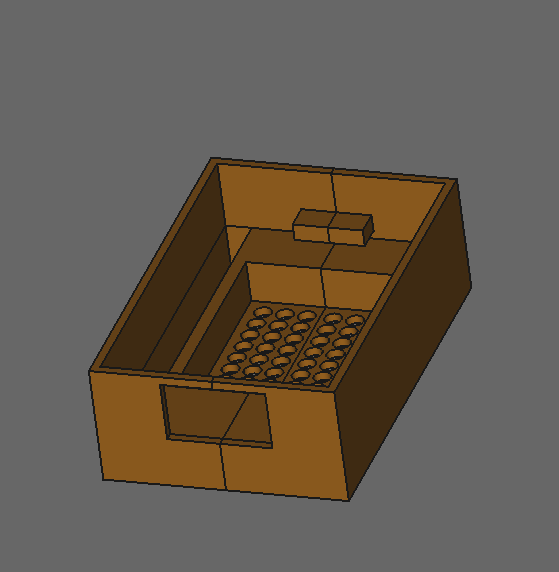

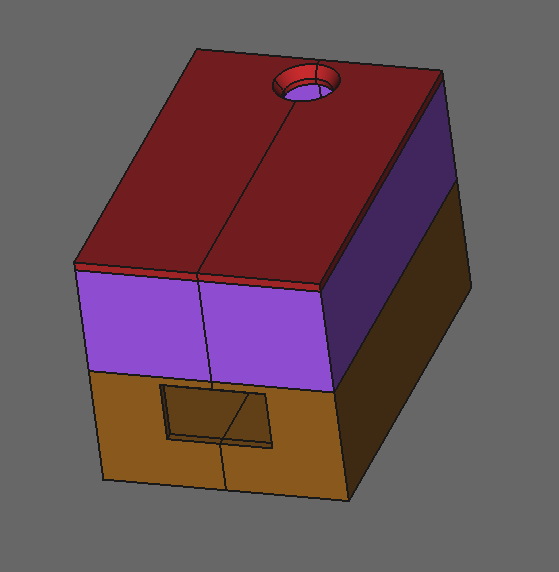
Also, I learned not to be too generous with the shrinking tube as it was impossible to fit the sender into the designated box, so I had to cut back on that…
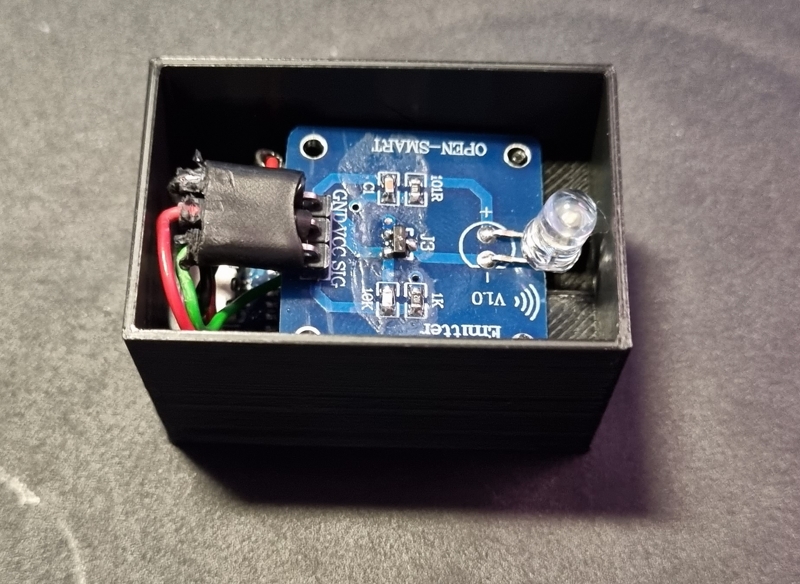
With everything in place, I just used double-sided tape to attach the box directly to my Onkyo so that the IR sender of my box would line up with the IR sensor of the Onkyo.
Home Assistant
And for the final step, integrating the remote into Home Assistant.
Custom Script
Personally, I use Node Red to concoct all my workflows. So I ended up with a series of buttons, each calling custom HA script which fires an IR Command event with the IR code (code), the remote’s hostname (host)1, and optionally an enum value command which is conveniently converted into the matching IR code, as payload.
1
2
3
4
5
event: IR Command
event_data:
  command: '{{command}}'
  code: '{{code}}'
  host: '{{host}}'
Node Red
Node Red listens for those events and fires an HTTP request with the data from the payload.

1
[{"id":"ba7a53b17c7823c4","type":"server-events","z":"b84d7b31.494928","name":"","server":"2eeb6592.c7741a","version":1,"event_type":"IR Command","exposeToHomeAssistant":false,"haConfig":[{"property":"name","value":""},{"property":"icon","value":""}],"waitForRunning":true,"outputProperties":[{"property":"payload","propertyType":"msg","value":"","valueType":"eventData"},{"property":"topic","propertyType":"msg","value":"$outputData(\"eventData\").event_type","valueType":"jsonata"}],"x":300,"y":1080,"wires":[["19bba8ab230f05e0"]]},{"id":"67f43af1a1f7e625","type":"http request","z":"b84d7b31.494928","name":"","method":"use","ret":"txt","paytoqs":"ignore","url":"","tls":"","persist":false,"proxy":"","authType":"","senderr":false,"x":990,"y":1080,"wires":[[]]},{"id":"3a799b22ccfa0dc6","type":"function","z":"b84d7b31.494928","name":"set HTTP parameters","func":"msg.headers = {}\nmsg.method = \"POST\"\nmsg.url = msg.payload.event.host + \"/ir\";\nmsg.headers[\"content-type\"] = \"application/json\"\n\n\nmsg.payload = {\n    \"code\": msg.payload.event.code\n};\n\nreturn msg","outputs":1,"noerr":0,"initialize":"","finalize":"","libs":[],"x":780,"y":1080,"wires":[["67f43af1a1f7e625"]]},{"id":"19bba8ab230f05e0","type":"function","z":"b84d7b31.494928","name":"determine IR code","func":"const codes = {\n    \"BD-DVD\":    \"0x4B3631CE\",\n    \"CBL-SAT\":   \"0x4BB6708F\",\n    \"STB-DVR\":   \"0x4BB6F00F\",\n    \"GAME\":      \"0x4BB6B04F\",\n    \"PC\":        \"0x4BB639C6\",\n    \"TV-CD\":     \"0x4BB6906F\",\n    \"BLUETOOTH\": \"0x4B780A70\",\n    \"VOL-UP\":    \"0x4BB640BF\",\n    \"VOL-DOWN\":  \"0x4BB6C03F\",\n    \"MUTING\":    \"0x4BB6A05F\",\n    \"POWER\":     \"0x4B36D32C\"\n};\n\nif(msg.payload.event.code === \"\") {\n    msg.payload.event.code = codes[msg.payload.event.command]\n}\nreturn msg;","outputs":1,"noerr":0,"initialize":"","finalize":"","libs":[],"x":550,"y":1080,"wires":[["3a799b22ccfa0dc6"]]},{"id":"2eeb6592.c7741a","type":"server","name":"Home Assistant","version":1,"legacy":false,"addon":false,"rejectUnauthorizedCerts":false,"ha_boolean":"y|yes|true|on|home|open","connectionDelay":true,"cacheJson":true}]
Lovelace
So finally, I was able to have my Onkyo integrated into my smart home. With matching labels for each button and the convenience to control it remotely (just in case I want to adjust the volume while I am in another room, for example).
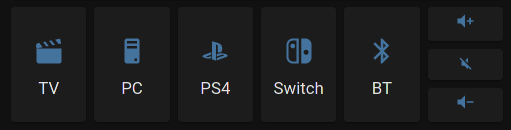
The code for the above screenshot ended up a bit verbose and complicated, as I also wrapped it into a conditional to only show up on Lovelace if the plug the receiver is plugged into is actually on. But for completeness sake, code to the volume up button as an example:
1
2
3
4
5
6
7
8
9
- type: button
  tap_action:
    action: call-service
    service: script.ir_command
    service_data:
      command: VOL-UP
      host: http://irremote
    target: {}
  icon_height: 20px
Conclusion
Integrating my Onkyo into my smart home took me longer than I initially hoped for (with all trial and error, not counting any breaks I took from the project when I was too frustrated, designing, printing and scrapping several prototypes for the casing, etc.) it took me around two weeks. But it was totally worth the effort and I am amazed by all the existing resources I could make use of. ❤️ The source code and CAD file for the casing are available online.
-
Just in case I should ever happen to have multiple such remotes in my network. ↩